証明書発行したところでnginxでhttpsサーバを立ち上げます。
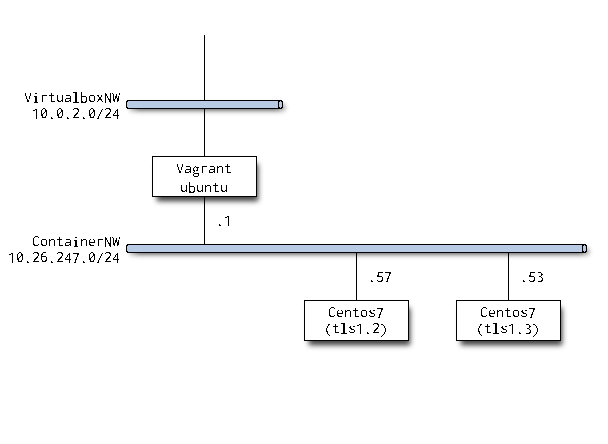
何度も載せますが構成図。

なぜnginxにしたのか
apacheは何度も触っているのでトレンドもと思い、検証内ですが最近はnginxばかり使っています。
また、F5社が買収したと言うことでゆくゆくはLTMにもnginxが入るんではないでしょうか。
BIGIP LTMもよく触るので慣れておきたいですね。
(というかnginxでバランシングすりゃいいとも思いますが)
パッケージインストール
ドキュメントに沿ってインストール。
[root@tls1-2 ~]# yum install yum-utils
[root@tls1-2 ~]# vi /etc/yum.repos.d/nginx.repo

[nginx-stable]
name=nginx stable repo
baseurl=http://nginx.org/packages/centos/$releasever/$basearch/
gpgcheck=1
enabled=1
gpgkey=https://nginx.org/keys/nginx_signing.key
module_hotfixes=true

[nginx-mainline]
name=nginx mainline repo
baseurl=http://nginx.org/packages/mainline/centos/$releasever/$basearch/
gpgcheck=1
enabled=1
gpgkey=https://nginx.org/keys/nginx_signing.key
module_hotfixes=true
[root@tls1-2 ~]# yum-config-manager --enable nginx-mainline
- インストール
[root@tls1-2 ~]# yum install nginx
ログをよく見たらここでopensslもインストールされるようです。
前回個別にインストールしたかのように書いちゃいました…すみません。
- バージョン
[root@tls1-2 ~]# nginx -v
nginx version: nginx/1.17.8
tls化
conf.d/defaultに直接tls化のパラメータ書きます。
デフォルトのhttpサーバをコメントアウトしてhttps用の設定に書き換える感じです。
これもドキュメント通りのパラメータです。
証明書の場所も指定して完了。
server {
    #listen       80;
    #server_name  localhost;

    listen              443 ssl;
    server_name         tls1-2.masashi.lab;
    ssl_certificate     /root/tls12.cert;
    ssl_certificate_key /root/tls12.key;
    ssl_protocols       TLSv1.2;
    ssl_ciphers         HIGH:!aNULL:!MD5;

…
- configテスト
servernameがwarning吐いてますが無視。
ドメインと違うからかな?
[root@tls1-2 ~]# nginx -t
nginx: [warn] conflicting server name "tls1-2.masashi.lab" on 0.0.0.0:443, ignored
nginx: the configuration file /etc/nginx/nginx.conf syntax is ok
nginx: configuration file /etc/nginx/nginx.conf test is successful
- ローカルアクセス
[root@tls1-2 ~]# curl -k https://localhost
<!DOCTYPE html>
<html>
<head>
<title>Welcome to nginx!</title>
<style>
    body {
        width: 35em;
        margin: 0 auto;
        font-family: Tahoma, Verdana, Arial, sans-serif;
    }
</style>
</head>
<body>
<h1>Welcome to nginx!</h1>
<p>If you see this page, the nginx web server is successfully installed and
working. Further configuration is required.</p>

<p>For online documentation and support please refer to
<a href="http://nginx.org/">nginx.org</a>.<br/>
Commercial support is available at
<a href="http://nginx.com/">nginx.com</a>.</p>

<p><em>Thank you for using nginx.</em></p>
</body>
</html>
見えたのでOK!
ホストからアクセス
キャプチャ取るのにローカルアクセスだと気分出ないのでホストからアクセスします。
CA証明書指定してアクセス
せっかく認証局から作ったので無視してアクセスするのは勿体ないです。
CA証明書はホストのhome(vagrantユーザ)に用意します。
ログを見たらコンテナディレクトリから無理やり持ってきていました。
この手順はあんまりよろしくなくてちゃんとコマンドがありますので次回書きます。
vagrant@ubuntu-bionic:~$ sudo cp /var/lib/lxd/containers/tls1-2/rootfs/etc/pki/CA/cacert.pem .
/home/vagrant/cacert.pem
hostsにcommon nameもちゃんと書いてcurlでアクセス。
curlはminimalでも入っているのにいろいろできて便利です。
愛用してます。
vagrant@ubuntu-bionic:~$ curl --cacert cacert.pem https://tls1-2.vagrant.lab
<!DOCTYPE html>
<html>
<head>
<title>Welcome to nginx!</title>
<style>
    body {
        width: 35em;
        margin: 0 auto;
        font-family: Tahoma, Verdana, Arial, sans-serif;
    }
</style>
</head>
<body>
<h1>Welcome to nginx!</h1>
<p>If you see this page, the nginx web server is successfully installed and
working. Further configuration is required.</p>

<p>For online documentation and support please refer to
<a href="http://nginx.org/">nginx.org</a>.<br/>
Commercial support is available at
<a href="http://nginx.com/">nginx.com</a>.</p>

<p><em>Thank you for using nginx.</em></p>
</body>
</html>
OK!
初回でも見ましたが-vで詳細も見てみます。
長いのでヘッダだけ。
vagrant@ubuntu-bionic:~$ curl -I -v --cacert cacert.pem https://tls1-2.vagrant.lab
* Rebuilt URL to: https://tls1-2.vagrant.lab/
*   Trying 10.26.247.57...
* TCP_NODELAY set
* Connected to tls1-2.vagrant.lab (10.26.247.57) port 443 (#0)
* ALPN, offering h2
* ALPN, offering http/1.1
* successfully set certificate verify locations:
*   CAfile: cacert.pem
  CApath: /etc/ssl/certs
* TLSv1.3 (OUT), TLS handshake, Client hello (1):
* TLSv1.3 (IN), TLS handshake, Server hello (2):
* TLSv1.2 (IN), TLS handshake, Certificate (11):
* TLSv1.2 (IN), TLS handshake, Server key exchange (12):
* TLSv1.2 (IN), TLS handshake, Server finished (14):
* TLSv1.2 (OUT), TLS handshake, Client key exchange (16):
* TLSv1.2 (OUT), TLS change cipher, Client hello (1):
* TLSv1.2 (OUT), TLS handshake, Finished (20):
* TLSv1.2 (IN), TLS handshake, Finished (20):
* SSL connection using TLSv1.2 / ECDHE-RSA-AES256-GCM-SHA384
* ALPN, server accepted to use http/1.1
* Server certificate:
*  subject: C=JP; ST=XXXX; L=XXXX-Shi; O=XXXX; OU=labo; CN=tls1-2.vagrant.lab
*  start date: Feb 23 09:49:06 2020 GMT
*  expire date: Feb 22 09:49:06 2021 GMT
*  common name: tls1-2.vagrant.lab (matched)
*  issuer: C=JP; ST=XXXX; O=XXXX; OU=labo; CN=masashi.lab
*  SSL certificate verify ok.
> HEAD / HTTP/1.1
最初は1.3でネゴシエーションかけてますがちゃんとtls1.2で通信してますね。
nginxで有効にしていないので1.3だと弾かれます。
vagrant@ubuntu-bionic:~$ curl -I -v --cacert cacert.pem https://tls1-2.vagrant.lab --tlsv1.3
* Rebuilt URL to: https://tls1-2.vagrant.lab/
*   Trying 10.26.247.57...
* TCP_NODELAY set
* Connected to tls1-2.vagrant.lab (10.26.247.57) port 443 (#0)
* ALPN, offering h2
* ALPN, offering http/1.1
* successfully set certificate verify locations:
*   CAfile: cacert.pem
  CApath: /etc/ssl/certs
* TLSv1.3 (OUT), TLS handshake, Client hello (1):
* TLSv1.3 (IN), TLS alert, Server hello (2):
* error:14094410:SSL routines:ssl3_read_bytes:sslv3 alert handshake failure
* Closing connection 0
curl: (35) error:14094410:SSL routines:ssl3_read_bytes:sslv3 alert handshake failure
というわけでnginxのhttps化(tls1.2)でした。
次回はtls1.3サーバの作成記を書いて本シリーズを終わりにしたいと思います。