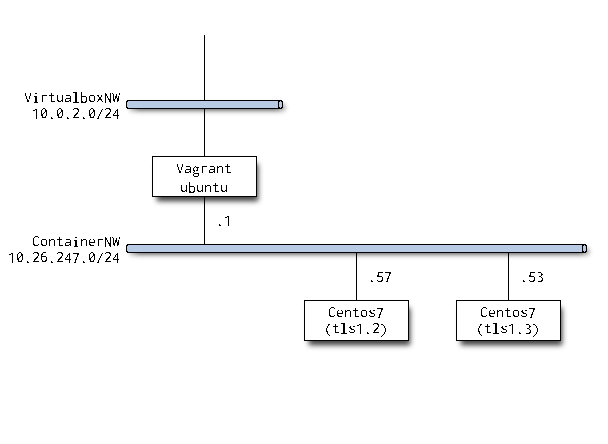
今回はtls1.3サーバのコンテナを作ります。
これもnginxです。
くどいですが環境。

nginxのbuild
パッケージ版のnginxはまだtls1.3に対応していないのでSourceからコンパイルします。
nginxというかopensslのほうですね。
makeとか久しぶりに叩きます。
各Source
- ドキュメント
必要なSourceをダウンロードして展開しておきます。
各URLは割愛。
今回も/root直下でやっちゃいます。
[root@tls1-3 ~]# ls -d */
nginx-1.17.8/  openssl-1.1.1d/  pcre-8.42/  zlib-1.2.11/
簡単なメモ。
makeします
nginxのディレクトリに移動してconfigure。
[root@tls1-3 nginx-1.17.8]# ./configure --prefix=/etc/nginx \
>   --user=nginx --group=nginx \
>   --with-threads --with-http_ssl_module --with-http_v2_module \
>   --with-openssl=/root/openssl-1.1.1d \
>   --with-openssl-opt=enable-tls1_3 \
>   --with-pcre=../pcre-8.42 --with-zlib=../zlib-1.2.11
設定具合をパッケージ版に寄せたかったので/etc配下にインストールします。
しかしこれだけだとnginxの環境が全部/etcに入ってしまいます。
binだlogだなんかも寄せるなら相当なチューニングが必要ですね。
この手順をどこから拾ってきたものか忘れてしまいましたが、
--with-openssl-opt=enable-tls1_3を指定するのがミソですね。
あと、../openssl-1.1.1dでよかったのに何でフルパスにしたんだっけ…?
configureが完了したらmakeします。
[root@tls1-3 nginx-1.17.8]# make
make -f objs/Makefile
make[1]: Entering directory `/root/nginx-1.17.8'

…
opensslまわりのコンパイルがメチャ長いです。
make完了したらインストールします。
[root@tls1-3 nginx-1.17.8]# make install
make -f objs/Makefile install
make[1]: Entering directory `/root/nginx-1.17.8'
test -d '/etc/nginx' || mkdir -p '/etc/nginx'

…
証明書の移動
作っておいた証明書をホスト経由でコンテナに移動します。
vagrant@ubuntu-bionic:~$ sudo lxc file push tls13.cert tls1-3/root/
vagrant@ubuntu-bionic:~$ sudo lxc file push tls13.key tls1-3/root/
この証明書はcpで無理やりコンテナディレクトリに持っていったら
所属ユーザが変になり気持ち悪かったのでlxcコマンド経由で移動させました。
これだとちゃんとrootユーザで移動できました。
(cpでやるとユーザが数字になってしまった)
-rw-r--r--  1 65534 65534    4513 Feb 24 07:42 tls13.cert
-rw-r--r--  1 65534 65534    1834 Feb 24 07:42 tls13.key
nginxの設定
パッケージ版とディレクトリ構成が違います。
今回はnginx.conf無いにtlsの設定を書いてしまいます。
tls1.3のみ使うようにします。
[root@tls1-3 conf]# diff -u nginx.conf.default nginx.conf
--- nginx.conf.default  2020-02-24 07:28:27.129942631 +0000
+++ nginx.conf  2020-02-24 07:56:34.217942631 +0000
@@ -95,23 +95,24 @@

     # HTTPS server
     #
-    #server {
-    #    listen       443 ssl;
-    #    server_name  localhost;
-
-    #    ssl_certificate      cert.pem;
-    #    ssl_certificate_key  cert.key;
+    server {
+        listen       443 ssl;
+        server_name  tls1-3.vagrant.lab;
+
+        ssl_certificate      /root/tls13.cert;
+        ssl_certificate_key  /root/tls13.key;
+       ssl_protocols           TLSv1.3;

     #    ssl_session_cache    shared:SSL:1m;
     #    ssl_session_timeout  5m;

-    #    ssl_ciphers  HIGH:!aNULL:!MD5;
-    #    ssl_prefer_server_ciphers  on;
+        ssl_ciphers  HIGH:!aNULL:!MD5;
+        ssl_prefer_server_ciphers  on;

-    #    location / {
-    #        root   html;
-    #        index  index.html index.htm;
-    #    }
-    #}
+        location / {
+            root   html;
+            index  index.html index.htm;
+        }
+    }

 }
サービス起動
起動の前にconfigチェック。
スクリプト系はsbin内にあります。
- ディレクトリ構成
[root@tls1-3 nginx]# ls -ld $(pwd)/*
drwx------ 2 nginx root 4096 Feb 24 07:33 /etc/nginx/client_body_temp
drwxr-xr-x 2 root  root 4096 Feb 24 07:56 /etc/nginx/conf
drwx------ 2 nginx root 4096 Feb 24 07:33 /etc/nginx/fastcgi_temp
drwxr-xr-x 2 root  root 4096 Feb 24 06:59 /etc/nginx/html
drwxr-xr-x 2 root  root 4096 Feb 24 07:53 /etc/nginx/logs
drwx------ 2 nginx root 4096 Feb 24 07:33 /etc/nginx/proxy_temp
drwxr-xr-x 2 root  root 4096 Feb 24 07:28 /etc/nginx/sbin
drwx------ 2 nginx root 4096 Feb 24 07:33 /etc/nginx/scgi_temp
drwx------ 2 nginx root 4096 Feb 24 07:33 /etc/nginx/uwsgi_temp
- config確認
[root@tls1-3 nginx]# sbin/nginx -t
nginx: the configuration file /etc/nginx/conf/nginx.conf syntax is ok
nginx: configuration file /etc/nginx/conf/nginx.conf test is successful
今回はserver nameのwarningが出てませんね。
どこの設定なんだろうか…。
- サービス起動
一応フルパスでサービスを起動します。
-cで読み込むconfigを指定して起動ですね。
/etc/nginx/sbin/nginx -c /etc/nginx/conf/nginx.conf
これをsystemd経由でするにはどうするんだろ?
分からないことがどんどん出てきます。
- ローカルアクセス
tls1.3指定で無事に見れました。
[root@tls1-3 nginx]# curl -k  https://localhost --tlsv1.3
<!DOCTYPE html>
<html>
<head>
<title>Welcome to nginx!</title>
<style>
    body {
        width: 35em;
        margin: 0 auto;
        font-family: Tahoma, Verdana, Arial, sans-serif;
    }
</style>
</head>
<body>
<h1>Welcome to nginx!</h1>
<p>If you see this page, the nginx web server is successfully installed and
working. Further configuration is required.</p>

<p>For online documentation and support please refer to
<a href="http://nginx.org/">nginx.org</a>.<br/>
Commercial support is available at
<a href="http://nginx.com/">nginx.com</a>.</p>

<p><em>Thank you for using nginx.</em></p>
</body>
</html>
ホストからアクセス
ホストからcurlでアクセス。
vagrant@ubuntu-bionic:~$ curl -Iv --cacert cacert.pem https://tls1-3.vagrant.lab --tlsv1.3
* Rebuilt URL to: https://tls1-3.vagrant.lab/
*   Trying 10.26.247.53...
* TCP_NODELAY set
* Connected to tls1-3.vagrant.lab (10.26.247.53) port 443 (#0)
* ALPN, offering h2
* ALPN, offering http/1.1
* successfully set certificate verify locations:
*   CAfile: cacert.pem
  CApath: /etc/ssl/certs
* TLSv1.3 (OUT), TLS handshake, Client hello (1):
* TLSv1.3 (IN), TLS handshake, Server hello (2):
* TLSv1.3 (IN), TLS Unknown, Certificate Status (22):
* TLSv1.3 (IN), TLS handshake, Unknown (8):
* TLSv1.3 (IN), TLS Unknown, Certificate Status (22):
* TLSv1.3 (IN), TLS handshake, Certificate (11):
* TLSv1.3 (IN), TLS Unknown, Certificate Status (22):
* TLSv1.3 (IN), TLS handshake, CERT verify (15):
* TLSv1.3 (IN), TLS Unknown, Certificate Status (22):
* TLSv1.3 (IN), TLS handshake, Finished (20):
* TLSv1.3 (OUT), TLS change cipher, Client hello (1):
* TLSv1.3 (OUT), TLS Unknown, Certificate Status (22):
* TLSv1.3 (OUT), TLS handshake, Finished (20):
* SSL connection using TLSv1.3 / TLS_AES_256_GCM_SHA384
* ALPN, server accepted to use http/1.1
* Server certificate:
*  subject: C=JP; ST=XXXX; L=XXXX-Shi; O=XXXX; OU=labo; CN=tls1-3.vagrant.lab
*  start date: Feb 24 07:40:57 2020 GMT
*  expire date: Feb 23 07:40:57 2021 GMT
*  common name: tls1-3.vagrant.lab (matched)
*  issuer: C=JP; ST=XXXX; O=XXXX; OU=labo; CN=masashi.lab
*  SSL certificate verify ok.
* TLSv1.3 (OUT), TLS Unknown, Unknown (23):
> HEAD / HTTP/1.1
ちゃんとtls1.3使ってますね。
tls1.2以下はnginxに設定していなのでハンドシェイク失敗します。
vagrant@ubuntu-bionic:~$ curl -Iv --cacert cacert.pem https://tls1-3.vagrant.lab --tlsv1.2
* Rebuilt URL to: https://tls1-3.vagrant.lab/
*   Trying 10.26.247.53...
* TCP_NODELAY set
* Connected to tls1-3.vagrant.lab (10.26.247.53) port 443 (#0)
* ALPN, offering h2
* ALPN, offering http/1.1
* successfully set certificate verify locations:
*   CAfile: cacert.pem
  CApath: /etc/ssl/certs
* TLSv1.2 (OUT), TLS handshake, Client hello (1):
* TLSv1.2 (IN), TLS alert, Server hello (2):
* error:1409442E:SSL routines:ssl3_read_bytes:tlsv1 alert protocol version
* stopped the pause stream!
* Closing connection 0
curl: (35) error:1409442E:SSL routines:ssl3_read_bytes:tlsv1 alert protocol version
むすび
4回にわたってtls1.2,1.3周りのフロー確認、環境構築の備忘でした。
文字に起こしてみると結構多くの手順を踏んだもんですね。
しかしvagrantとLXDのおかげでOS周りの構築に手を取られることなく
すんなりtlsサーバ周りのみの確認ができました。
本当に便利になりましたね。
しかしtls1.3自体の仕様をしっかり把握できていない事が分かったのでまた改めて勉強したいと思います。